Vinyl – Horse Fence Gate Installation
- Horse Fence Installation – Post & Rail – pdf
- Horse Fence Installation – Post & Rail with Bufftech® Texture – pdf
Post & Rail – Crossbuck 2-Rail, 3-Rail and 4-Rail
1. Getting Started
- Be sure to call underground prior to digging
- Assemble gates (if necessary) and decide where they will be located
- Stake out the fence line
- Space and mark post hole locations for gate and sections, (spacer bar/template may be useful)
- Start at gate end post and work outward to determine proper fence height relative to ground
2. Dig Holes
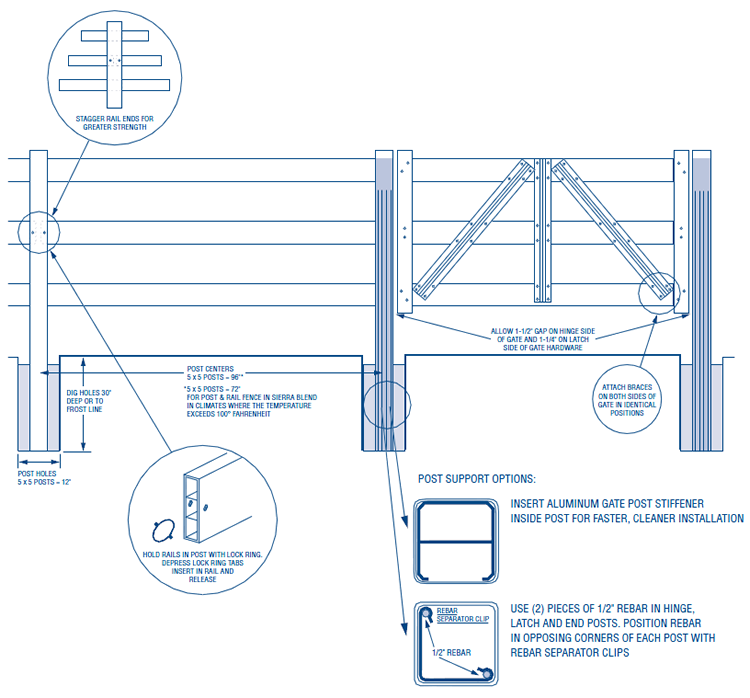
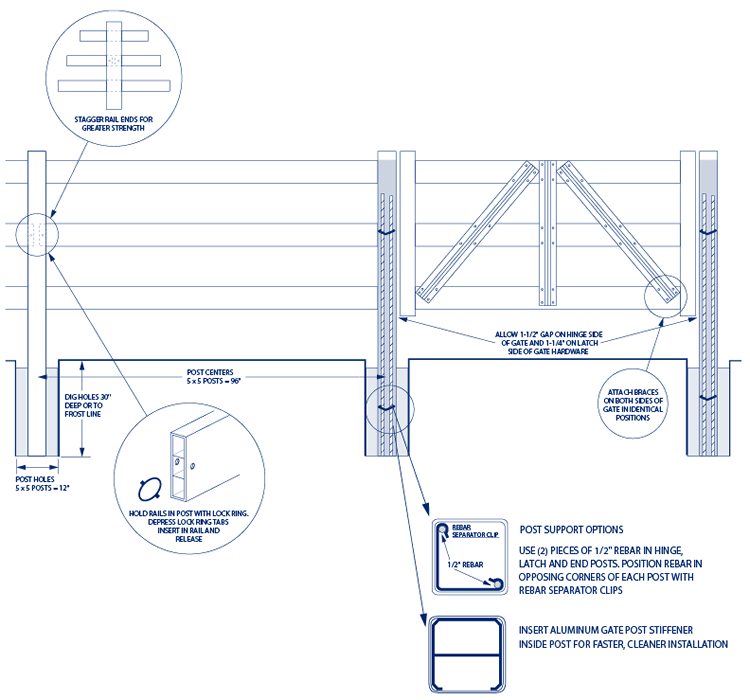
- Dig holes 30″ deep or to frost line – hole size for 5 x 5 posts = 12″
- Clean holes and check for straight walls
3. Install First Post
- Insert post in hole
- Determine rough height
- Fill hole around post with concrete mix (sand, gravel and cement) approximately 2″ below grade
- Tamp concrete in hole to eliminate air pockets
- Level and square post
- Fence may be installed post and bottom rails first, then upper rails
4. Install Rails
- Tape the ends of any rail going into a post that is to be filled with concrete to prevent concrete seepage
- Standard rails are supplied in 16 foot lengths
- For rolling terrain, rails may need to be cut to 95-1/2″
- The starting point for rails should be staggered from post to post for bottom/mid/toprail for maximum strength
- Insert lock ring into one end of rail by depressing tabs, insert in rail end and release
- Depress lock ring tabs to insert bottom rail in first post
- Tabs will recoil to hold rail in post
- If bottom rail is 16′ long, slide rail through second post and then insert post in ground
- Insert lock ring in rail end, insert end into third post
- When installing rails leave a 1″ gap between rail ends, inside post to allow for expansion
5. Support and Secure
- Block up bottom rail to determine correct fence height
- Fill holes around posts with concrete mix
- Tamp, level, and square
- Fence assembly may be continued by installing all bottom rails first or one section at a time
- To lower a post, place a wood block from corner to corner of the post and carefully tap with a mallet
- Never strike the PVC post without a wood support
6. Crossbuck
- Insert lock rings in diagonal rails and insert into each post
NOTE: Standard diagonal rails are cut to 97″ to compensate for angle of install
7. Hang Gate/Install Hardware
- For complete details, see gate installation instructions in hardware box
- Position gate between posts
- Allow 1-1/2″ gap on hinge side of the gate and 1-1/4″ on latch side to allow for the gate swing and hardware
- Block up gate to square with fence, rails should be level
- Gate hardware must be mounted to two sides of the post
8. Solidify Gate Posts
It is critical that gate hinge and latch posts are solid to ensure proper gate functionality.
Two methods are available:
A. Concrete and rebar
– Use two pieces of 1/2″ rebar in each hinge, latch and end post
– Rebar should extend from the bottom of the hole to 12″ from the top of the post
– Hold rebar in opposite corners of post with rebar separator clips
– Fill post with concrete mix to cover rebar and hardware fasteners
– Tamp post with a rubber mallet to eliminate air pockets
– Leave gate on blocks for 72 hours to allow concrete to set
B. Aluminum gate post stiffener
– Slide aluminum gate stiffener inside hinge, latch or end posts with open end facing routed hole
– Drive a screw through the vinyl into the aluminum stiffener at the bottom of the post to hold in place
– Insert post into ground
– Fill hole with concrete around outside of post
9. Install Caps
- Install post caps by pressing in place inside post
Post & Rail with Bufftech® Texture – 2-Rail, 3-Rail and 4-Rail
1. Getting Started
- Be sure to call underground prior to digging
- Assemble gates (if necessary) and decide where they will be located
- Stake out the fence line
- Space and mark post hole locations for gate and sections, (spacer bar/template may be useful)
- Start at gate end post and work outward to determine proper fence height relative to ground
- * In climates where the temperature exceeds 100° Fahrenheit, we recommend installing Sierra Blend product on 6′ post centers
2. Dig Holes
- Dig holes 30″ deep or to frost line – hole size for 5 x 5 posts = 12″
- Clean holes and check for straight walls
3. Install First Post
- Insert post in hole
- Determine rough height
- Fill hole around post with concrete mix, (sand, gravel and cement), approximately 2″ below grade
- Tamp concrete in hole to eliminate air pockets
- Level and square post
- Fence may be installed post and bottom rails first, then upper rails
4. Install Rails
- White product uses 1-1/2 x 5-1/2 rails
- Sierra Blend product uses 2 x 6 rails
- Tape the ends of any rail going into a post that is to be filled with concrete to prevent concrete seepage
- Standard rails are supplied in 16 foot lengths, (12 foot rails are available for Sierra Blend product)
- For rolling terrain, rails may need to be cut to 95-1/2″
- The starting point for rails should be staggered from post to post for bottom/mid/top rail for maximum strength
- Insert lock ring into one end of rail by depressing tabs, insert in rail end and release
- Depress lock ring tabs to insert bottom rail in first post
- Tabs will recoil to hold rail in post
- If bottom rail is 16′ long, slide rail through second post and then insert post in ground
- Insert lock ring in rail end, insert end into third post
- When installing rails leave a 1″ gap between rail ends, inside post to allow for expansion
5. Support and Secure
- Block up bottom rail to determine correct fence height
- Fill holes around posts with concrete mix
- Tamp, level, and square
- Fence assembly may be continued by installing all bottom rails first or one section at a time
- To lower a post, place a wood block from corner to corner of the post and carefully tap with a mallet
- Never strike the PVC post without a wood support
6. Hang Gate/Install Hardware
- For complete details, see gate installation instructions in hardware box
- Position gate between posts
- Allow 1-1/2″ gap on hinge side of the gate and 1-1/4″ on latch side to allow for the gate swing and hardware
- Block up gate to square with fence, rails should be level
- Gate hardware must be mounted to two sides of the post
7. Solidify Gate Posts
It is critical that gate hinge and latch posts are solid to ensure proper gate functionality.
Two methods are available:
A. Aluminum gate post stiffener
– Slide aluminum gate stiffener inside hinge, latch or end posts
– Drive a screw through the vinyl into the aluminum stiffener at the bottom of the post
– Insert post into the ground
– Fill hole with concrete around outside of post
B. Concrete and rebar*
– Use two pieces of 1/2″ rebar in each hinge, latch and end post
– Rebar should extend from the bottom of the hole to 12″ from the top of the post
– Hold rebar in opposite corners of post with rebar separator clips
– Fill post with concrete mix to cover rebar and hardware fasteners
– Tamp post with a rubber mallet to eliminate air pockets
– Leave gate on blocks for 72 hours to allow concrete to set
8. Install Caps
- Install post caps by pressing in place inside post