Vinyl – Horse Fence Installation
Most people who can use a level and a tape measure, look down a fence line to see if it is correctly aligned and are willing to take the time to do the job right are probably qualified to install our ranch fence. It is however very important that the job be done right because this is a lifetime fence and if mistakes are made you’ll be looking at them for a long time. So, whether you install the fence yourself or have someone install it for you, it pays to know how to go about it.
Before you start:
1. Check to see if a permit is needed in your area.
2.Check with your local utility companies to locate any underground utilities.
3.Be certain of the boundaries of your property.
4.Read the instructions below
Tools Required:
1.100 Ft. Tape Measure
2.Post Level (this allows you to check two planes of the post for plumb)
3.A spool of nylon string and some wood or re-bar stakes
4.Hammer and a saw (a plywood blade is best)
5.Spray paint to mark holes for digging (silver or a fluorescent color )
6.Hand post hole digger plus a 12 inch power auger
7.A special notching tool for the rails – for Heritage fencing only (you can buy one or borrow mine)
8. Clear PVC Cement (or Silicon Sealant) to glue on the caps.(be sure to glue them on or the mower will get ’em!)
Fence Components:
Post Size
2 rail 5in.x5in.x68in., 3 rail 5in.x5in.x84in., 4 rail 5in.x5in.x96in.
Post Spacing
96 in. (8ft)on center
RaiI Size
1.5″x5.5″x192″ or 2″x6″x192″ Height for both 3 and 4 Rail is 54 in. – 60in. above grade
Hilly or Sloping Terrain:
If you’re going up or down hills you can cut the rails into 8ft lengths so that they allow changes in elevation. In extreme situations you may need to “open” the routed holes. In all situations the more gentle the transition the better it looks so if the land abruptly transitions from flat to slope you may want to spread that transition over several fence sections to make for a professional looking installation.
Laying out the job:
1. Draw a diagram of the job layout and count the number of corner posts, end posts and “T”posts that you will need.
2. Establish the fence line using the string and stakes allowing 2 1/2 inches from the string line to the center of the post. Using the 100 ft. tape and the spray paint mark an “X” where each post hole will be drilled. Remember that the posts are set at 8 ft. on center and the rails are 16 ft. long so if you are rounding a corner you may want to cut the rails into 8 ft. lengths for the rounded area.
Installing the posts:
3. Drill your holes 30 inches deep with the power auger at each “X” and clear the holes with the hand post hole digger.
4. Place the posts in the holes and lay out 1-80 lb. bag of premixed quikcrete at each hole (if your soil is extremely sandy like beach sand you should probably use 2-80 lb. bags per hole.) I know some people might want to save the cost of the concrete by using dirt but why install a lifetime fence in a temporary footing?
5. Pour a couple of quarts of water in the hole with the post, empty the bag of quikcrete into the hole, then put a couple of quarts of water on top. Let it settle a few minutes and then backfill the hole with dirt. Check the plumb of the post as you backfill. If you need to adjust the post closer or further from the string line always use your feet at the base of the post. Don’t push or pull at the top of the post.
Installation Diagram:
Posts are set at 8 ft on center and the rails are 16 ft long. This means the rails go through every other post

6. After you have several posts installed you will need to check the tops of the posts to be sure that they are set at the right depth. If your terrain is irregular it is important to remember that all transitions should be gradual and flowing to create a professional looking installation. For this reason it is best to set your reference posts first and then gradually adjust to them.
The suggested height of the reference posts is:
2 Rail : 30 in. in ground, 38 in. above ground.
3 Rail : 30 in. in ground, 54 in. above ground.
4 Rail : 36 in. in ground, 60 in. above ground.
If the post is too high use a hammer and a block of wood to tap it deeper. If it is too low just pull it up to the correct height and put a little wet cement into the post itself to fill the small space under the post you have created.( If you’re installing gate posts you may want to use a larger footing and more concrete depending on your soil.)
Installing the rails:
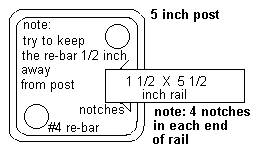
7. The 16 ft. rails go through every other post. To create a strong fence it is important to “weave” the fence as follows: For 3 rail fence cut an 8 ft. rail and with four notches on each end insert it into the post as the second rail. For a 4 rail fence do the same with the bottom rail. Then run the 16 ft. rails for the remainder until you get to the end of the run.
(For Heritage only, Remember to put 4 notches in each end of each rail).
It is best to let the cement cure for 24 hours before setting the rails. If you are terminating at a gate post duct tape the end of each rail before inserting into post. Wipe off excess cement and glue on the caps with a PVC cement.
Installing the gates:

8. Insert 2 lengths of #4 re-bar into each gate post and fill with wet concrete. Be certain that all gate hardware is mounted on the post before you fill it. Wait 24 to 48 hours for the cement to cure before hanging the gate. Please click here for detailed gate installation instructions.
Tuff-Stuff – Horse Fence Installation
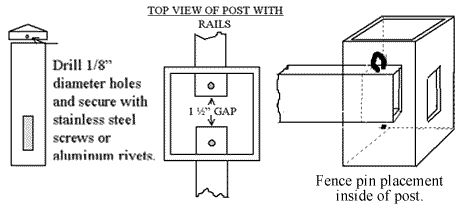
The primary difference between the installation of Tuff-Stuff fence concerns the way the rail is locked into the post. Tuff-Stuff uses a chrome lock pin that drops into the rail vertically.

| Mechanical Properties | ASTM # | Typical Values |
| Density (lbs/cu. in.) | D792 | 0.023 – 0.028 |
| Compression (psi @ 0.4″) | D695 | 3000 – 3100 |
| Tensile (psi) | D638 | 2100 – 2600 |
| Flexural Strength (psi) | D790 | 4000 – 5000 |
| Tangent Modulus (psi) | 216,000 – 222,000 | |
| Coef Thermal Expansion (in/in/deg F) | D696 | 0.00007 |
| Vicat Softening Point (F) | Chevron Chemical | 150 – 160 (F) |
| Brittleness Point (F) | Chevron Chemical | (-100) – (-104) (F) |

