Quick jump menu:
- Printable Dealer Instructions
- Install Railing on a Wood or Vinyl Deck
- Install Railing on a Concrete Surface
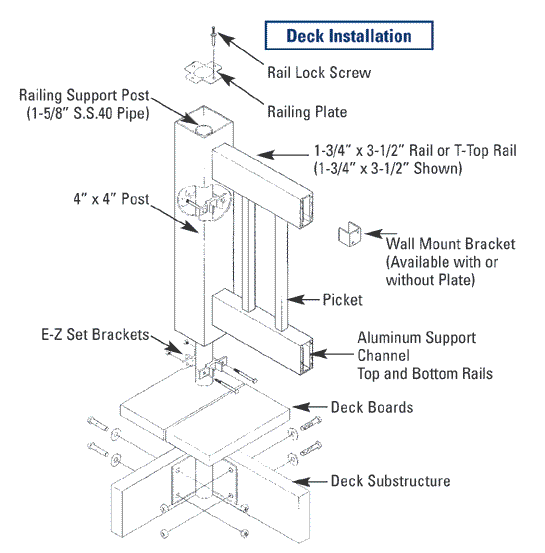
Wood or Vinyl Deck Installation
Method One
The simplest and most ecomonical method for installing vinyl railing on a wood deck or stair is to use a pressure treated 4″ x 4″ (actual dimension 3 – 1/2″ x 3 – 1/2″) as the structure and sleeving it with vinyl. ( Check with your local building code officials for proper 4 x 4 wood installation procedures) The wood post should be cut just below the routed opening for the top rail.
The vinyl post is then slipped over the wood post.
The bottom rail is attached to the post with the “U” bracket that is provided for this type of installation. This installation method will require on site modification of the bottom rail end to allow the rail to be slid over the bracket. Use a jig saw / sabre saw with a blade intended for aluminum to accomplish this modification. Then install the pickets and the top rail and post cap plus the post trim ring per the instructions provided.
Method Two
We also have specially designed mounting hardware available for mounting to decks. See diagram below. This complete hardware package is available in four sizes: 36″ and 42″ plus slightly taller versions for stairs.
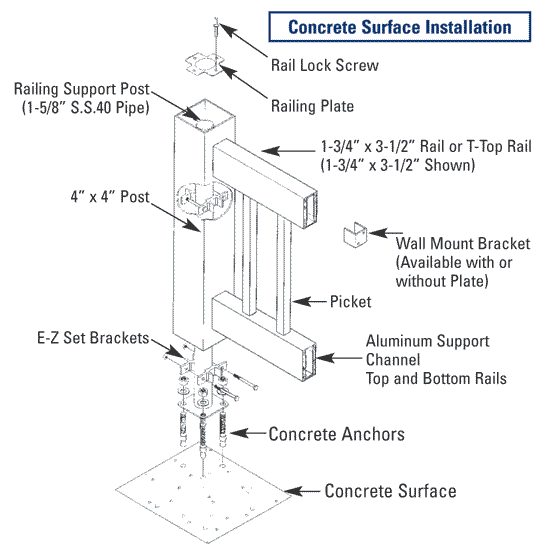
Concrete Installation
Method One
The simplest solution for mounting on concrete is as follows:
- Mark where each 4 x 4 vinyl post will be mounted on the concrete
- Drill Two (2) half inch holes in the concrete 4 inches deep in opposite corners of the post.
- Epoxy 2 lengths of 1/2 inch (#4) rebar into the concrete. The length of the re-bar should be just to the bottom of the top rail on the post.
- Slip post over the re-bar and fill with concrete to just below bottom of top rail.
Method Two
- Mark where each 4 x 4 vinyl post will be mounted on the concrete
- Core drill a 2″ hole into the concrete 4″ deep
- Epoxy a 2″ heavy wall galvanized pipe into cement. It should be cut just below the bottom of the top rail.
- Slide post over and fill with concrete to just below the bottom of the top rail.
Method Three
Use our optional, specifically designed concrete post mounting kit – see diagram below. Available for 36″ and 42″ high railings.